安装Redis与phpredis
时间:2011-8-19 作者:smarteng 分类: 服务器相关
Redis是什么?Redis本质上一个Key/Value数据库,与Memcached类似的NoSQL型数据库,但是他的数据可以持久化的保存在磁盘上,解决了服务重启后数据不丢失的问题,他的值可以是string(字符串)、list(列表)、sets(集合)或者是ordered sets(被排序的集合),所有的数据类型都具有push/pop、add/remove、执行服务端的并集、交集、两个sets集中的差别等等操作,这些操作都是具有原子性的,Redis还支持各种不同的排序能力
Redis 2.0更是增加了很多新特性,如:提升了性能、增加了新的数据类型、更少的利用内存(AOF和VM)
Redis支持绝大部分主流的开发语言,如:C、Java、C#、PHP、Perl、Python、Lua、Erlang、Ruby等等。
Redis的功能:
1、Redis的Sharding:Redis支持客户端的Sharding功能,通过一致性hash算法实现,当前Redis不支持故障冗余,在集群中不能在线增加或删除Redis
2、Redis的master/slave复制:
1. 一个master支持多个slave
2. Slave可以接受其他slave的连接来替代他连接master
3. 复制在master是非阻塞的,而在slave是阻塞的
4. 复制被利用来提供可扩展性,在slave端只提供查询功能及数据的冗余
3、Redis的Virtual Memory功能:vm是Redis2.0新增的一个非常稳定和可靠的功能,
vm的引入是为了提高Redis的性能,也就是把很少使用的value保存到disk,而key保存在内存中。实际上就是如果你有10w的keys在内存中,而只有仅仅10%左右的key经常使用,那么Redis可以通过开启VM尝试将不经常使用的Value转换到disk上保存
4、Redis的附加档案(AOF)功能:Redis通过配置的策略将数据集保存到aof中,当Redis挂掉后能够通过aof恢复到挂掉前的状态。
A.快速安装Redis
1.去Redis官网下载Redis源码
2.解压并执行make安装
1.# tar zxvf redis-2.2.8.tar.gz2.#cd redis-2.2.8.tar.gz3.#make4.#src/redis-server //注意不要关掉Server
3.测试是否成功安装
1.#src/redis-cli2.redis>set blogname kylingood3.OK4.redis>get blogname5."kylingood"
B.安装PHP的phpredis模块
1.下载phpredis扩展模块
2.增加phpredis模块
1.#tar zxvf owlient-phpredis-2.1.1-1-g90ecd17.tar.gz2.#cd owlient-phpredis-2.1.1-1-g90ecd173.# /usr/local/php/bin/phpize //这个phpize是安装php模块的4.# ./configure –with-php-config=/usr/local/php/bin/php-config5.# make6.# make install
接下来在php.ini中添加:
extension=redis.so
extension_dir=/usr/local/lib/php/extensions/no-debug-non-zts-20060613/
重启apache或者nginx
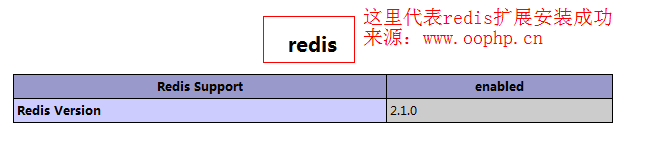
3.查看php.ini配置,看是否有如下Redis模块
如图:
4.测试PHP操作Redis服务器.
1.<?php2.$redis = new Redis();3.$redis->connect('127.0.0.1',6379);4.$redis->set('test','Hello redis world!');5.echo $redis->get('test');6.exit;7.?>
如果你能成功看到页面输出:Hellow redis world! 那恭喜您,我们Redis初级配置已大功告成。
最后,安装中遇到的问题:
a.启动redis-server出现:
Warning: no config file specified, using the default config.
In order to specify a config file use 'redis-server /path/to/redis.conf'
这个只需要在执行启动时加上,redis.conf的配置路径:
#src/redis-server /usr/local/redis-2.2.8/redis.conf
b.启动redis-server出现:
WARNING overcommit_memory is set to 0! Background save may fail under low memory condition.
To fix this issue add 'vm.overcommit_memory = 1' to /etc/sysctl.conf and then reboot or run the command 'sysctl vm.overcommit_memory=1' for this to take effect.
警告:过量使用内存设置为0!在低内存环境下,后台保存可能失败。为了修正这个问题,请在/etc/sysctl.conf 添加一项 'vm.overcommit_memory = 1' ,然后重启(或者运行命令'sysctl vm.overcommit_memory=1' )使其生效。
这个警告的处理就很简单了,按照他说的,改一下,重启。发现依旧报警告。然后只好再运行一下命令令'sysctl vm.overcommit_memory=1' 。
c.wget https://github.com/owlient/phpredis 出现:
--2011-05-29 15:26:31-- https://github.com/owlient/phpredis/tarball/master
Resolving github.com... 207.97.227.239
Connecting to github.com|207.97.227.239|:443... connected.
ERROR: certificate common name *.github.com' doesn't match requested host namegithub.com'.
To connect to github.com insecurely, use `--no-check-certificate'.
Unable to establish SSL connection.
解决方案:在wget 后面加上 “--no-check-certificate” 。原因是:Unable to establish SSL connection,有时间再找找,可能和系统设置有关。
相关软件下载和文章参考列表:
http://redis.io/download
https://github.com/owlient/phpredis
http://blog.csdn.net/chenggong2dm/archive/2010/12/28/6102162.aspx
http://my.oschina.net/zhaocx/blog/14133
http://blog.sina.com.cn/s/blog_620ad6170100ocqr.html

smarteng
人生就流星,虽然转瞬即逝,但也有永恒。
- 使用Erlang的OTP框架创建应用
- php 使用curl模拟登录discuz以及模拟发帖
- 腾讯QQ、阿里旺旺、淘宝、MSN在线状态代码生成
- 新浪微博错误代码解析
- erlang程序设计笔记
- 《HTML 5与CSS 3权威指南》权威的HTML5与CSS3实战教程
- dedecms修改数据库密码配置文件
- 服务器优化小记--Etag和Expires
- Mediawiki的配置和修改方法
- 在PHP5中使用PHPMailer发送邮件
- PHP中冒号、endif、endwhile、endfor介绍
- PHP框架——ThinkPHP
- 使用Golang的官方mock工具--gomock、mockgen
- MacOs 电脑关闭/打开IPV6
- QQ登陆成功返回openId后与网站绑定
- MacOs 电脑关闭/打开IPV6
- MySQL中datetime和timestamp的区别
- C++声明结构
- 如何保证数据库和缓存的一致性
- 优雅的golang日期时间处理库go-carbon
- API接口纪要
- 解析 Golang 测试(11)- 模糊测试
- 解析 Golang 测试(10)- 什么是好的单测
- 解析 Golang 测试(9)- 一篇文章搞懂 testify
- 解析 Golang 测试(8)- gomonkey 实战
- 解析 Golang 测试(7)- 如何针对 Redis 进行 Fake 测试
- 解析 Golang 测试(6)- 如何针对 MySQL 进行 Fake 测试
- 解析 Golang 测试(5)- MySQL 经典 mock driver—— sqlmock
- 解析 Golang 测试(4)- 一篇文章教你分清 Mock,Stub,Fake
- 解析 Golang 测试(3)- goconvey 实战
- 2023年11月(1)
- 2023年10月(1)
- 2023年3月(2)
- 2023年2月(1)
- 2022年12月(1)
- 2022年9月(13)
- 2022年8月(5)
- 2022年7月(9)
- 2022年6月(2)
- 2022年5月(2)
- 2022年4月(1)
- 2022年3月(2)
- 2021年12月(1)
- 2021年11月(14)
- 2021年10月(2)
- 2021年9月(111)
- 2015年3月(1)
- 2014年5月(4)
- 2014年4月(18)
- 2014年1月(1)
- 2013年11月(2)
- 2013年7月(1)
- 2013年6月(1)
- 2013年3月(13)
- 2013年2月(3)
- 2013年1月(1)
- 2012年12月(8)
- 2012年11月(8)
- 2012年10月(1)
- 2012年9月(13)
- 2012年8月(4)
- 2012年6月(2)
- 2012年5月(10)
- 2012年4月(13)
- 2012年3月(9)
- 2012年2月(8)
- 2011年11月(1)
- 2011年8月(9)
- 2011年7月(8)
- 2011年6月(8)
- 2011年5月(7)
- 2011年4月(19)
- 2011年3月(15)
- 2011年2月(8)
- 2011年1月(9)
- 2010年12月(2)
- 2010年11月(2)
- 2010年10月(2)
- 2010年9月(8)
- 2010年8月(9)
- 2010年7月(1)
- 2010年6月(9)
- 2010年5月(5)
- 2010年1月(7)
- 2009年12月(21)
- 2009年11月(29)
- 2009年10月(100)
- 2009年8月(1)
- 2009年7月(15)
- 2009年6月(52)